


Performing Remote Shooting with a Smartphone (Wi-Fi Function) (EOS M50)
Solution
There are different ways of controlling the camera remotely from a smartphone.
Controlling the Camera via Bluetooth
- You can use a Bluetooth enabled smartphone for remote shooting and switching of image display.
- This is convenient if you want to connect quickly while shooting, or if you will control playback while connected to a TV.
Connecting via NFC
- Simply touch an NFC-compatible Android smartphone against the camera to connect the devices.
Controlling the Camera via Wi-Fi
- You can shoot as you view a shooting screen on your smartphone.
IMPORTANT
- Before connecting to the camera, you must install the free dedicated Camera Connect app on the smartphone.
- Please refer to "Related information" for details on the smartphones which can be connected with a camera wirelessly.
- Interface or functions of Camera Connect are subject to change, for application improvement or update. In such a case, features of Camera Connect may differ from sample screens or operation instructions in this explanation.
NOTE
- In the following explanation, smartphone setting procedures are indicated by the
 icon, and camera setting procedures are indicated by the
  icon.
icon. - For convenience, smartphones, tablets, and other compatible devices are collectively referred to as "smartphones."
- Keep your fingers or other objects off the Wi-Fi antenna area. Covering this may decrease the speed of your image transfers.
- Depending on the condition of the network you are using, it may take a long time to send movies. Be sure to keep an eye on the camera battery level.
- When sending movies to smartphones, note that the supported image quality varies depending on the smartphone. For details, refer to the smartphone user manual.
- The setting procedures and items may differ depending on the smartphone model you use and its OS. For more information, refer to your smartphone's instruction manual.
- On the screen, wireless signal strength is indicated by the following icons: [
 ] high, [
  ] medium, [
  ] low, [
  ] weak.
 - Connections require that a memory card be in the camera.
Illustrations and screenshots in this explanation may differ slightly from the actual equipment.
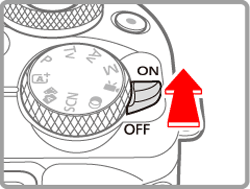
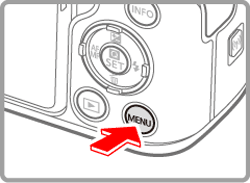
1. Turn the camera on.
2. Press the  button.
button.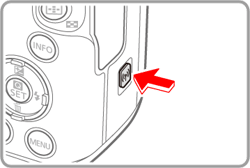
- If the wireless settings screen is not displayed initially when you press the button, press the button again.
3. Choose [Enable] and press the  button.
button.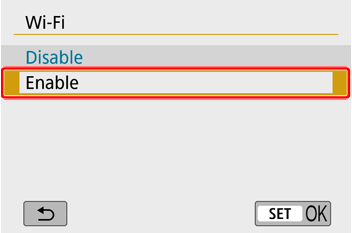
4. A message about nicknames is displayed.
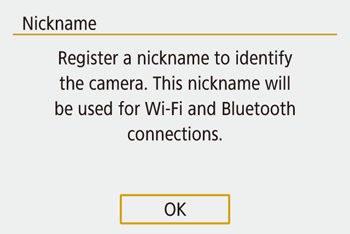
- Press the button and check the nickname (camera name).
5. After checking, return to the function settings menu: MENU button.
REFERENCE
- Nicknames are 1 – 8 characters and can be changed later.
6. Choose [OK] and press the button.
button.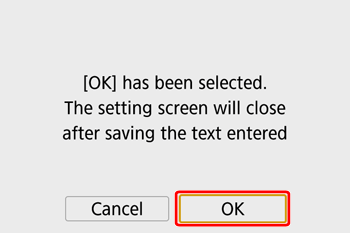
7. Press the MENU button.
Return to the function settings menu.
NOTE
- Wi-Fi and Bluetooth signal transmission can be turned off as follows.
- Wi-Fi: Press the MENU button and choose [  ] -> [
  ] -> [Wireless communication settings] -> [Wi-Fi settings] -> [Wi-Fi] -> [Disable].
] -> [ ] -> [Wireless communication settings] -> [Wi-Fi settings] -> [Wi-Fi] -> [Disable]. - Bluetooth: Press the MENU button and choose [ ] -> [ ] -> [Wireless communication settings] -> [Bluetooth function] -> [Bluetooth function] -> [Disable].
] -> [ ] -> [Wireless communication settings] -> [Bluetooth function] -> [Bluetooth function] -> [Disable]. 1. Install Camera Connect.
REFERENCE
- Camera Connect can be installed from Google Play or the App Store. You can also access Google Play or the App Store from a QR code that you can display on the camera when registering the smartphone on the camera.
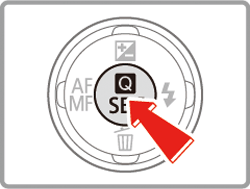
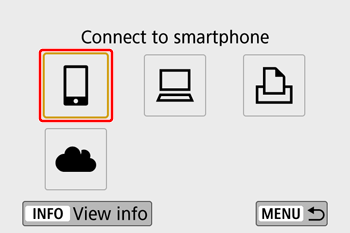
 2. Press the MENU button. 3. Choose [ ] and press the button.
 4. Choose [ ] -> Choose [Wireless communication settings] and press the button.
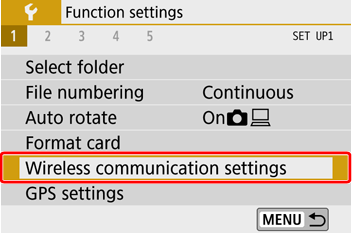 5. Choose [Bluetooth function] and press the button.
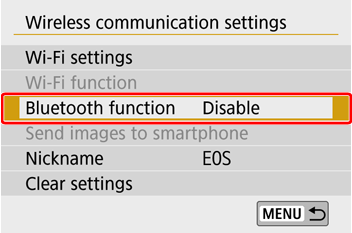 6. Choose [Bluetooth function] and press the button.
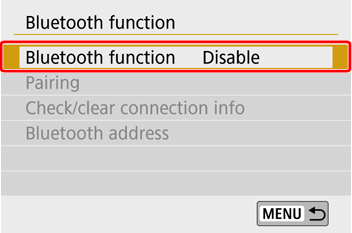 7. Choose [Smartphone] and press the button.
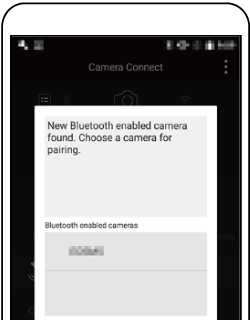
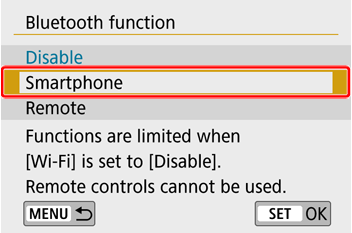 8. Choose [Pairing] and press the button.
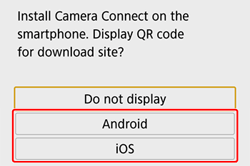
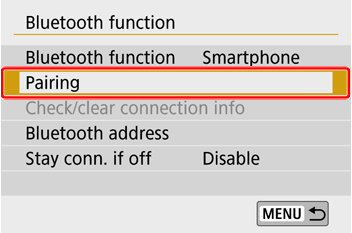 9. Choose [Do not display] and press the button.
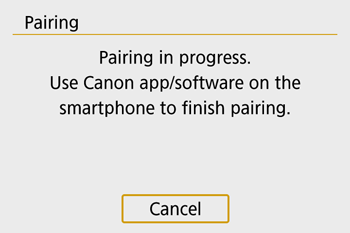
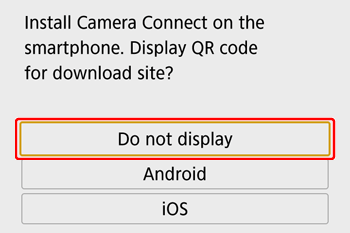
- A message is displayed indicating that pairing is in progress.
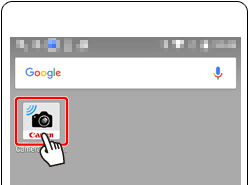
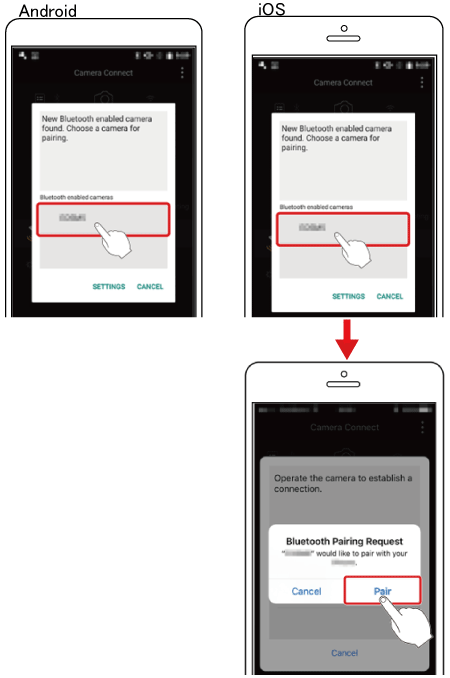
 10. Start Camera Connect.
- Activate Bluetooth on the smartphone, and then start Camera Connect on the smartphone.
- After the camera is recognized, a camera selection screen is displayed.
 11. Select the camera to connect to.
- Choose the camera nickname.
- Complete the pairing process for the smartphone.
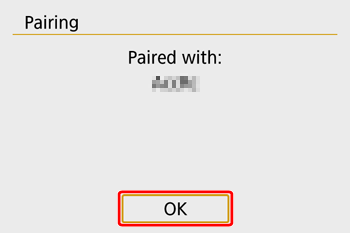
 12. Complete the pairing process.
Choose [OK] and press the button.
button.
- On the pairing notification screen, press the button.
IMPORTANT
- Battery life may be shorter when you use the camera after pairing, because power is consumed even when power saving is active.
13. In Camera Connect on the smartphone, choose [Bluetooth remote controller].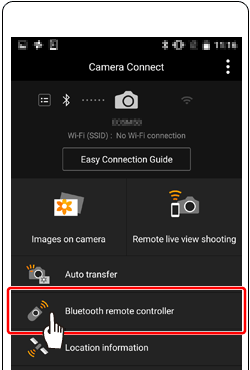 14. The smartphone screen changes to a screen for remote control via Bluetooth.
- Choose [
 ].
].
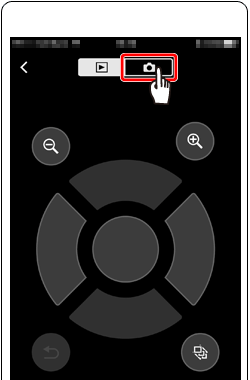 15. Use the smartphone to shoot in Shooting mode.
- Touch [ ].
NOTE
- Using Bluetooth functions consumes battery power even after auto power off turns the camera off. To turn Bluetooth off when it is not needed, press the MENU button and choose [ ] -> [ ] -> [Wireless communication settings] -> [Bluetooth function] (twice) -> [Disable].
Use an Android smartphone's NFC to simplify the process of installing Camera Connect and connecting to the camera.
IMPORTANT
When using NFC, keep the following points in mind.
- If your Camera Connect version is 2.7.10 or later, check the Android OS version of your smartphone. If the version is 10.0 or later, the camera firmware must be up to date to take advantage of NFC functionality. You can download the latest firmware from the Canon website.
- Avoid strong impact between the camera and smartphone. This may damage the devices.
- Depending on the smartphone, the devices may not recognize each other immediately. In this case, try holding the devices together in slightly different positions. If a connection is not established, keep the devices together until the camera screen changes.
- Do not place other objects between the camera and smartphone. Also, note that camera or smartphone covers or similar accessories may block communication.
1. Install Camera Connect.REFERENCE
- Camera Connect can be installed from Google Play or the App Store. You can also access Google Play or the App Store from a QR code that you can display on the camera when registering the smartphone on the camera.
2. Turn on NFC on the camera and smartphone.
3. Establish the connection.Touch the N-Mark ( ) on the smartphone with Camera Connect installed against the camera's N-Mark.
) on the smartphone with Camera Connect installed against the camera's N-Mark.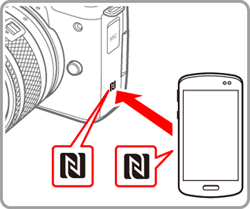 4. Adjust the privacy setting.
When the screen is displayed, choose [All images] and press the button.
button.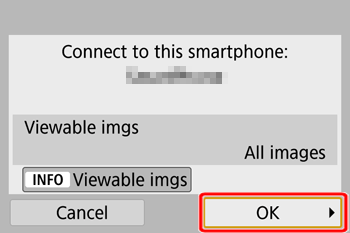
- [Wi-Fi on] is displayed on the camera.
5. Use Camera Connect to shoot remotely, browse images on the camera, or save them to the smartphone.NOTE
- To disable NFC connections, choose [ ] tab -> [Wireless communication settings] -> [Wi-Fi settings] -> [NFC connection] -> [Disable].
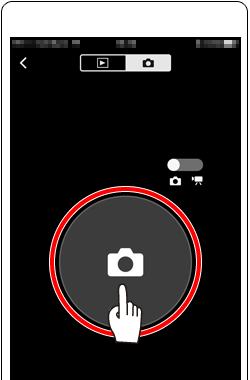
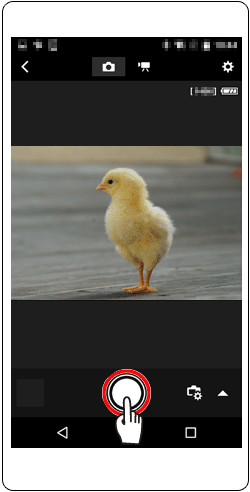
6. On the smartphone, select [Remote live view shooting] from the Camera Connect menu screen.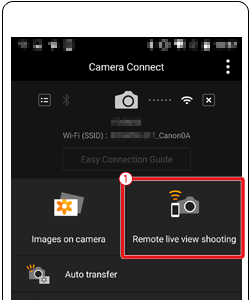 7. Once the camera is ready for remote live view shooting, a live image from the camera is displayed on the smartphone.
- Use the smartphone to shoot, Touch [
 ].
].
These steps show how to use the camera as an access point, but you can also use an existing access point.
1. Install Camera Connect.REFERENCE
- Camera Connect can be installed from Google Play or the App Store. You can also access Google Play or the App Store from a QR code that you can display on the camera when registering the smartphone on the camera.
2. With the camera on, press the button.
- If the wireless settings screen is not displayed initially when you press the button, press the button again.
3. Choose [  ].
]. 4. Choose [Register a device for connection] and press the button.
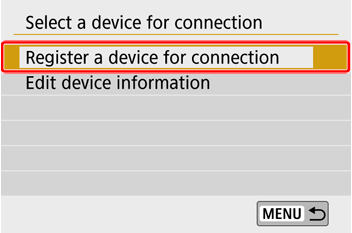 5. Choose [Do not display] and press the button. 6. Check the SSID (
 ) and password (
 ).
).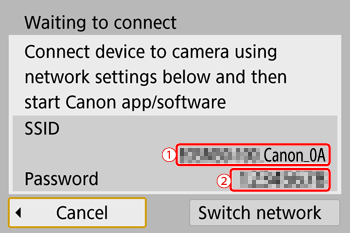
- The SSID ends with _Canon0A.
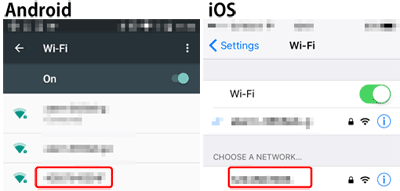
7. Connect the smartphone to the network.- In the smartphone's Wi-Fi setting menu, choose the SSID (network name) checked in step 6 () to establish a connection.
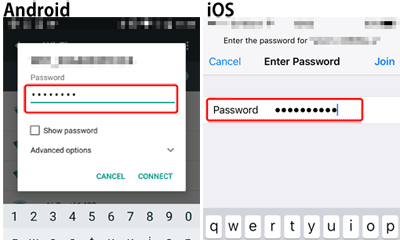
- In the password field, enter the password checked in step 6 ().
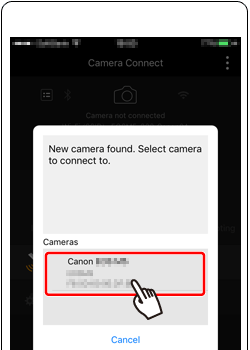
 8. Start Camera Connect.
- Touch the [
 ] icon to start the [Camera Connect] app.
9. Choose the camera to connect to.- On the camera selection screen displayed on the smartphone, choose the camera to begin pairing.
10. Establish a Wi-Fi connection.
- Choose [OK] and press the button.
- [Wi-Fi on] is displayed on the camera.
11. Use Camera Connect to shoot remotely, browse images on the camera, or save them to the smartphone. 12. On the smartphone, select [Remote live view shooting] from the Camera Connect menu screen. 13. Once the camera is ready for remote live view shooting, a live image from the camera is displayed on the smartphone.- Use the smartphone to shoot, Touch [ ].
*Android™ and Google Play™ are trademarks of Google Inc.
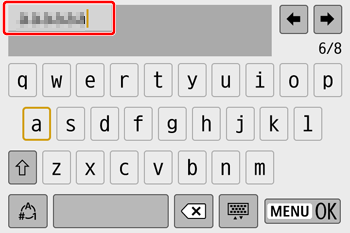
Use the on-screen keyboard to enter wireless settings and other information.
Note that the length and type of information you can enter varies depending on the function you are using.
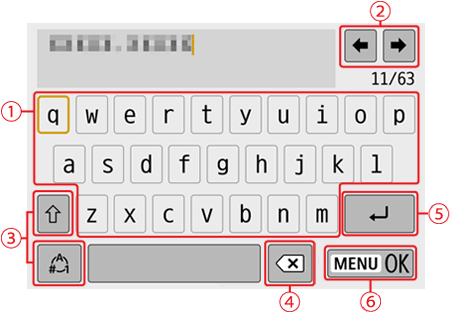
| •Entering characters Touch a character to enter it. |
| •Moving the cursor Touch  / /  . . |
 | •Switching input modes : Switch to uppercase. : Switch to uppercase. : Switch to numbers or symbols. : Switch to numbers or symbols. |
 | •Deleting characters Touch  . . |
 | •Entering line breaks Touch  . . |
 | •Confirming input Touch  . . |
REFERENCE
When returning to the previous screen, press the MENU button.