


Uninstalling the Printer Driver
Solution
This explains the procedure for uninstalling a driver. There are two methods for uninstalling: starting the uninstaller from Windows, and using the uninstall file.
 Prerequisites
Confirm that the following conditions are satisfied. Complete the preparation operations.
- Driver Installation
- The driver to be uninstalled was not installed using WSD
- Drivers installed using WSD must be uninstalled from [Devices and Printers], [Printers and Faxes], or [Printers]. For Windows 10, uninstall from [Settings] > [Devices] > [Printers & scanners] > [Printers].
- When starting the computer, log on as a member of Administrators.
- [Desktop] screen display (when using Windows 8/8.1/Server 2012/Server 2012 R2)
Procedures To Uninstall Using the Uninstaller
1. Start the uninstaller of the driver.
- In Windows 10/Server 2016:
1-A-1. Display [Settings] > [System] > [Apps & features].
1-A-2. Select the driver you want to uninstall → click [Uninstall].
- In operating systems other than the above:
1-B-1. Display [Control Panel] > [Programs] > [Uninstall a program].
1-B-2. Select the driver you want to uninstall → click [Uninstall/Change].
2. Select the name of the device you want to uninstall → click [Delete].
[Cleanup]: Click this to simultaneously delete all files and registry information relating to all of the drivers displayed in the list, not just the selected driver. Click [Delete] to perform a normal uninstallation of the driver.

3. If the confirm deletion message is displayed, click [Yes].
4. In the [Delete Printer] screen, click [Exit].
To Uninstall Using the Uninstall FileYou can uninstall a driver with the uninstall file in the supplied CD-ROM or the installation folder.
*Specify the folder for your language in [xxxx].
1. Double-click [UNINSTAL.exe] stored in the following folder.
- For UFR II
32-bit version: UFRII\[xxxx]\32BIT\misc
64-bit version: UFRII\[xxxx]\x64\misc
- For PCL
32-bit version: PCL\[xxxx]\32BIT\misc
64-bit version: PCL\[xxxx]\x64\misc
- For PS
32-bit version: PS\[xxxx]\32BIT\misc
64-bit version: PS\[xxxx]\x64\misc
2. Go to 3. of "To Uninstall Using the Uninstaller."
IMPORTANT
When you upgrade a driver, you can overwrite the old driver with a newer one. Uninstalling the driver is not required before the upgrade.
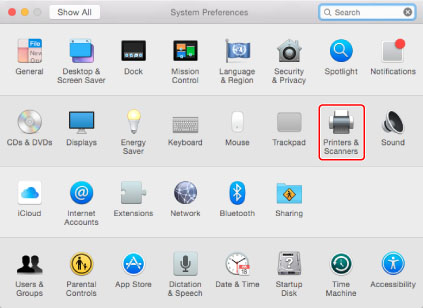
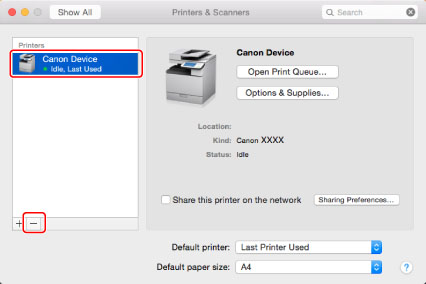
1. Open [System Preferences] → click [Print & Scan] or [Printers & Scanners].
2. Select all devices set from the driver you are deleting → click [-].
3. Delete the folders and files for the driver you are deleting.
- [System Volume]/Library/Printers/Canon/CUPS_Printer
- [System Volume]/Library/Printers/PPDs/Contents/Resources/CNPZU***ZU.ppd.gz
Where *** indicates a character string that represents the printer model.

If you delete a "ppd.gz" file other than that of the printer model you want to delete, the driver may not work correctly.

If the [Authenticate] dialog box is displayed, enter the administrators name and password → click [OK].
4. Restart your computer.
Uninstallation is complete.