


Creative Auto <CA> Shooting (EOS REBEL SL1 / EOS 100D)
Solution
The method for shooting in <CA> Creative Auto mode is explained below.
NOTE
Icons used on this page:
< >: Creative Auto / <
 >: Scene Intelligent Auto / <
 >: Quick Control button / <
 >: Cross keys / <
 >: Setting button / <
 >: Playback button / <
 >: Main Dial
>: Creative Auto / <>: Scene Intelligent Auto / <>: Quick Control button / <>: Cross keys / <>: Setting button / <>: Playback button / <>: Main Dial * The icons and markings indicating the camera’s buttons, dials, and settings correspond to the icons and markings on the camera and on the LCD monitor.
In the < > mode, you can set the following functions before shooting:
> mode, you can set the following functions before shooting:  Extra Effect Shot,
  Ambience-based shots,
  Background blur,
  Drive/self-timer mode, and
  Flash firing.
* CA stands for Creative Auto.
1. Set the camera's power switch to <ON>.
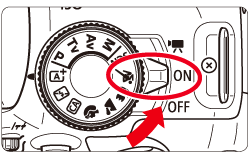
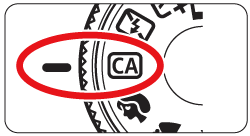
2. Set the Mode Dial to <>.
>.
3. Press the <> button to display the Quick Control screen.
> button to display the Quick Control screen.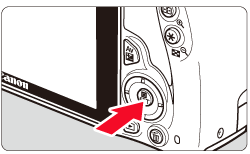
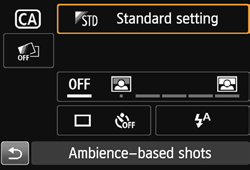
4. Press the <> to select the function.
> to select the function.The selected function and Feature guide will appear.
For setting procedure and details on each function, see Using Quick Control.5. Press the shutter button halfway to autofocus.
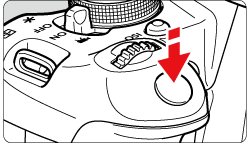
-The dot inside the AF point achieving focus flashes briefly in red. At the same time, the beeper will sound and the focus confirmation light < > in the viewfinder will light up.
> in the viewfinder will light up.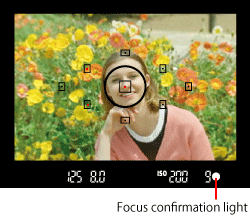
6. Take the picture.
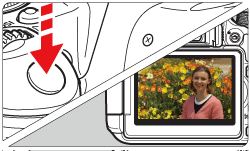
Press the shutter button completely to take the picture.
-The captured image will be displayed for 2 sec. on the LCD monitor.
-After taking the picture, retract the built-in flash by pushing it down with your fingers.
Pressing the <> button enables you to set the following:
> button enables you to set the following: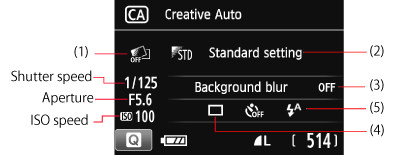 Extra Effect Shot
- You can select any of the following effects before shooting: [Creative filters], [Picture Styles], and [Ambience-based shots].
- Turn the < > dial to select [
 : Enable]. Tap on [
  ] to return to the Quick Control screen. You can also press < > and make the selection.
 - Turn the < > dial to select a shooting effect.
- When you take a picture, two images will be recorded. One with the effect applied and one without. Immediately after you take a picture, both images will be displayed together. The image without the effect is displayed on the left and the one with the effect will be on the right.
- Registering your favorite shooting effects
- During the image review immediately after shooting and during playback, the image applied with the effect will have the [  ] icon. After you press the [
  ] button and then the <INFO. > button,
] icon. After you press the [ ] button and then the <INFO. > button,you can check which shooting effect was applied.
- You can register up to two shooting effects under [  : Favorite effect].]
: Favorite effect].]When you select the registered [ :Favorite effect], you can shoot with that shooting effect applied. You can also overwrite the [ : Favorite effect].
:Favorite effect], you can shoot with that shooting effect applied. You can also overwrite the [ : Favorite effect].REFERENCE
If you are using an Eye-Fi card and have set it to erase images after their transfer, the image without the effect will not be displayed during the playback immediately after shooting.
Ambience-based shots- You can choose the ambience you want to convey in your images.
- Press the <
 > keys or turn the < > dial to select the ambience. You can also select it from a list by pressing < >.
Background blur
- If [OFF] is set, the degree of background blur will change depending on the brightness.
- If it is set to other than [OFF], you can adjust the background blur regardless of brightness.
- If you turn the < > dial to move the cursor to the right, the background will look sharper.
- Turning the < > dial to move the cursor to the left will blur the subject’s background. Note that depending on the lens’ maximum aperture (f/number), certain slider adjustments may not be selectable (indicated by・).
- If you use Live View shooting, you can see how the image is blurred in front of and behind the point of focus. While you turn the < > dial, [Simulating blur] will be displayed on the LCD monitor.
- This function cannot be set if you use flash. If <
 > has been set and you set Background blur, <
  > will be set automatically.
IMPORTANT
- If [Simulating blur] is effective during Live View shooting, the image shown while <
 > is blinking may have more noise than the actual image being recorded or it may look dark.
 - You cannot set both Extra Effect Shot and Ambience-based shots
at the same time.
- You cannot set both Extra Effect Shot and Background blur at the
same time.
Drive/self-timer mode: Use the < > dial to make the selection.You can also select it from a list by pressing < >.
>.[  ] Single shooting: Shoot one image at a time.
] Single shooting: Shoot one image at a time.[  ] Continuous shooting: While you hold down the shutter button completely, shots will be taken continuously. You can shoot up to approx. 4 shots per second.
] Continuous shooting: While you hold down the shutter button completely, shots will be taken continuously. You can shoot up to approx. 4 shots per second. [  ] Self-timer: 10sec./remote control: The picture is taken 10 seconds after you press the shutter button. A remote controller can also be used.
] Self-timer: 10sec./remote control: The picture is taken 10 seconds after you press the shutter button. A remote controller can also be used.[  ] Self-timer: 2 sec.: The picture is taken 2 seconds after you press the shutter button.
] Self-timer: 2 sec.: The picture is taken 2 seconds after you press the shutter button.[  ] Self-timer: Continuous: Press the <
  > keys to set the number of multiple shots (2 to 10) to be taken with the self-timer. 10 seconds after you press the shutter button, the set number of multiple shots will be taken.
] Self-timer: Continuous: Press the < > keys to set the number of multiple shots (2 to 10) to be taken with the self-timer. 10 seconds after you press the shutter button, the set number of multiple shots will be taken. Flash firing: Turn the < > dial to select the desired setting. You can also select it from a list by pressing < >.[  ] Auto flash : The flash fires automatically when necessary.
] Auto flash : The flash fires automatically when necessary.[  ] Flash on : The flash fires at all times.
] Flash on : The flash fires at all times.[ ] Flash off : The flash is disabled.
] Flash off : The flash is disabled.IMPORTANT
- If you have set Extra Effect Shot, [ ] [ ] cannot be set.
- If you have set Background blur, you cannot use flash.
REFERENCE
[ ] Tips for shooting without flash
] Tips for shooting without flash- Prevent camera shake if the shutter speed in the viewfinder blinks.
-Under low light when camera shake is prone to occur, the viewfinder’s shutter speed display will blink. Hold the camera steady or use a tripod. When using a zoom lens, use the wide-angle end to reduce blur caused by camera shake even while handholding the camera.
- Take portraits without flash.
- In low-light conditions, tell the subject to keep still until the picture is taken. Any movement by the subject during shooting may result in the subject being blurred in the picture.