


If the Printer and Computer Are Connected by a USB Cable
Solution
Install the printer driver on a computer. The printer driver is software required for printing from an application. This section describes the procedure for installing the printer driver on a computer connected to the printer by a USB cable.
IMPORTANT
When there is insufficient free hard disk space, a message will appear during the installation. Stop the installation and increase the free space of the disk, and then install the printer driver again.
NOTE
- If you want to update the additional driver (alternate driver) which was installed on the print server, perform the following procedure.
1. Uninstall the printer driver used in the print server. [Uninstalling the Printer Driver]
2. Install the new printer driver on the print server. [Installing the Printer Driver]
3. See [Configuring the Print Server] and install the additional driver again.
- This printer does not come with a USB cable. Have an appropriate one available for the computer you are using. Use a USB cable with the following symbol.

- The screenshots used in this section are from Windows XP Professional.
1. Make sure that the computer and printer are OFF.
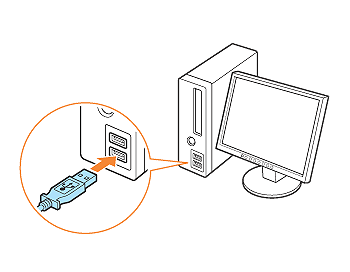
2. Connect the USB cable to the printer.
2-1. Open the USB port cover.
2-2. Connect the B-type (square) end of the USB cable to the USB connector on the printer.
2-3. Close the USB port cover.
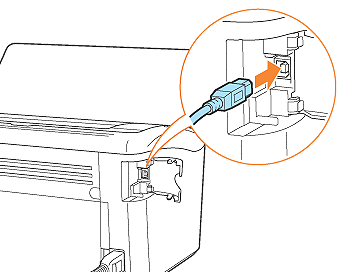
3. Connect the A-type (flat) end of the USB cable to the USB port on the computer.
4. Turn the computer on and start up Windows.
5. Log on as a user with administrator rights.
IMPORTANT
- If a Wizard or dialog box appears through the Plug and Play automatic setup, click [Cancel], turn the printer OFF, and then install the printer driver using this procedure.
- If you are not sure about the permissions, ask your computer administrator.
6. Insert the "LBP3010/LBP3018/LBP3050 (or LBP3100/LBP3108/LBP3150) User Software" CD-ROM supplied with the printer into the CD-ROM drive.
If the CD-ROM is already in the drive, eject the disk and re-insert it into the drive.
NOTE
- If you are using Windows Vista and the [AutoPlay] dialog box appears, click [Run AUTORUN.EXE].
- If you are using Windows Vista and the [User Account Control] dialog box appears, click [Continue].
- If CD-ROM Setup does not appear, display it using the following procedures. (The CD-ROM drive name is indicated as "D:" in this manual. The CD-ROM drive name may differ depending on the computer you are using.)
- If you are using an operating system other than Windows Vista, select [Run] from the [Start] menu, enter "D:\English\MInst.exe", and then click [OK].
- If you are using Windows Vista, enter "D:\English\MInst.exe" in [Start Search] under the [Start] menu, and then press the [ENTER] key on your keyboard.
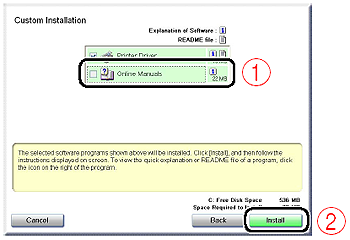
7. Click [Easy Installation] or [Custom Installation].
- If you want to install the printer driver and User's Guide: [Easy Installation]
- If you want to install only the printer driver: [Custom Installation]

8. Click [Install].
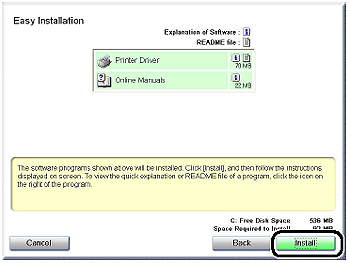
If you selected [Custom Installation] in Step 7, clear the [Online Manuals] check box (1), and then click [Install] (2).
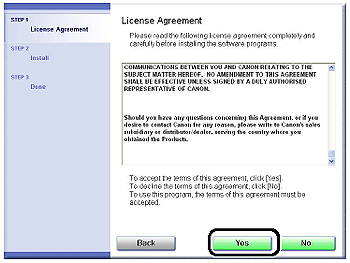
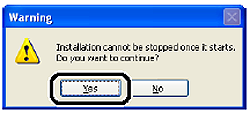
9. Confirm the contents, then click [Yes].
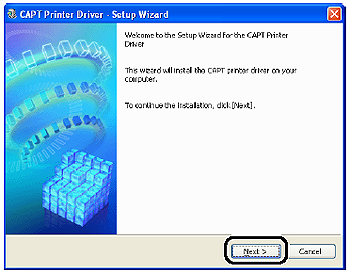
10. Click [Next].
11. Select [Install with USB Connection] (1), then click [Next] (2).

Depending on the system environment, a message that prompts you to restart the computer may appear. In this case, restart the computer and install the printer driver again.
12. Click [Yes].
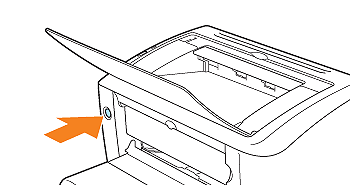
13. When the following screen is displayed, turn the printer ON.

Press the power switch to turn the printer ON.
Installation of the printer driver starts automatically.
If [Easy Installation] was selected in Step 7, User's Guide is installed after the printer driver installation.
NOTE
- Depending on the system environment, the installation may take a long time.
- If the printer is not recognized automatically even after the USB cable is connected, see [When Installing the Printer Driver from the CD-ROM, the Printer Is Not Recognized Automatically Even After the USB Cable Is Connected].
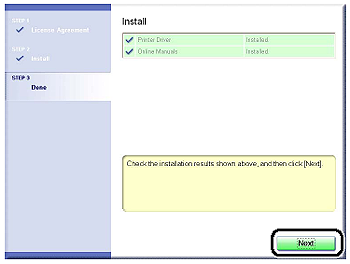
14. Confirm the installation results, then click [Next].
NOTE
If the printer driver is not installed properly, see "User's Guide" (HTML manual) in the CD-ROM supplied with the printer.
15. Select the [Restart Computer Now (Recommended)] check box (1), then click [Restart] (2).
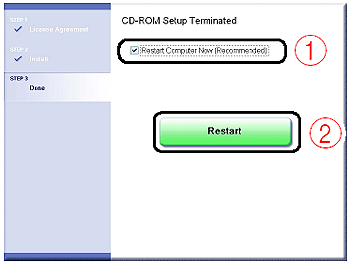
Windows restarts.
The installation of the printer driver is completed.
You can take the CD-ROM out of the CD-ROM drive after the installation is completed.