


如何使用 EOS Utility 透過即時顯示功能遙控拍攝短片 (EOS 5D Mark II)
解決方案
您可以透過 EOS Utility 遙控操作相機並從 EOS Utility 的螢幕拍攝短片。
IMPORTANT
- 拍攝的短片檔案儲存至相機的記憶卡上。因此,要在電腦上使用拍攝的影像,需要將其下載到電腦上。關於如何下載,請參閱相關資訊。
- 當顯示 [遙控即時顯示視窗 (Remote Live View window)] 時,您無法操作相機。當 <
 > (即時顯示拍攝) 按鈕被按下時,即時顯示影像也將顯示在相機的液晶螢幕上,允許您操作相機的同時查看影像。
1. 連接相機至電腦,然後設定相機的電源開關為 <ON>。
請參閱相關資訊以了解如何連接相機至電腦。
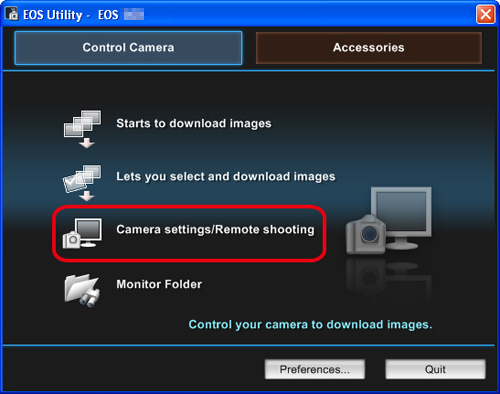
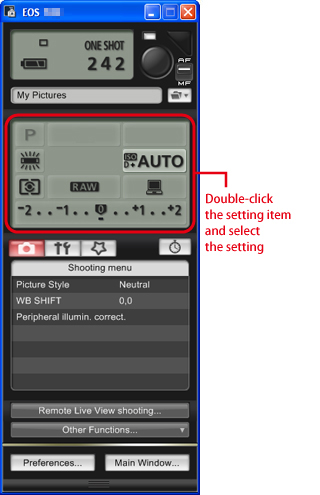
2. EOS Utility 啟動後,按一下 [相機設定/遙控拍攝 (Camera settings/Remote shooting)]。
3. 拍攝視窗出現後,請設定拍攝的設定項。
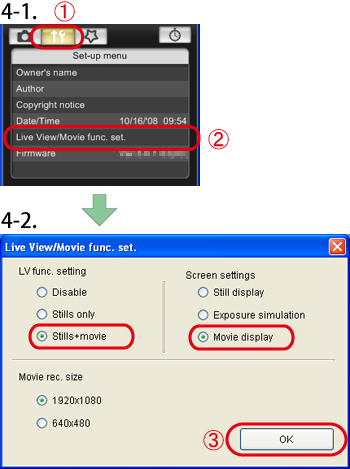
4. 設定即時顯示功能。
4-1. 按一下 顯示 [功能設定選單 (Function Setting Menu)],然後按一下 [即時顯示/短片功能設定 (Live View/Movie func. set)] (
 )。
)。
顯示 [功能設定選單 (Function Setting Menu)],然後按一下 [即時顯示/短片功能設定 (Live View/Movie func. set)] ( )。4-2. 出現 [即時顯示/短片功能設定 (Live View/Movie func. set.)] 視窗,在即時顯示功能設定中選擇 [靜止影像+短片 (Stills+movie)],在螢幕設定中選擇 [短片顯示 (Movie display)],設定短片記錄大小,然後按一下 [確定 (OK)] ( )。
)。
)。
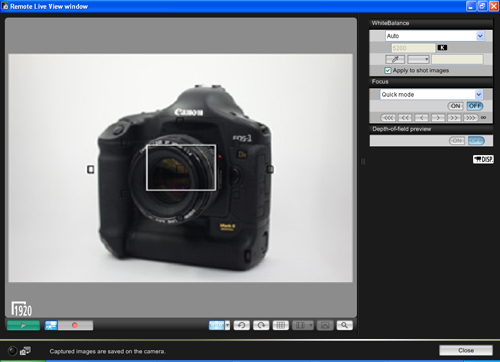
5. [遙控即時顯示視窗 (Remote Live View window)] 出現,檢視拍攝影像。
NOTE
如果 [遙控即時顯示視窗 (Remote Live View window)] 未出現,按一下 [遙控即時顯示拍攝 (Remote Live View shooting)]。
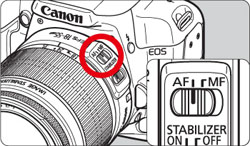
6. 使用 AF (自動對焦) 對焦時,將鏡頭對焦模式開關設定為 <AF>。
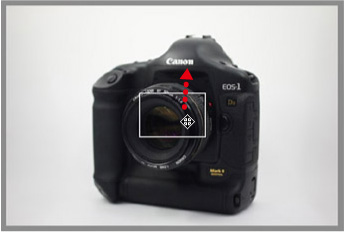
7. 如果滑鼠箭頭移至螢幕的長方形框內,其形狀將按如下更改。將放大顯示框拖曳到您要對焦的區域。
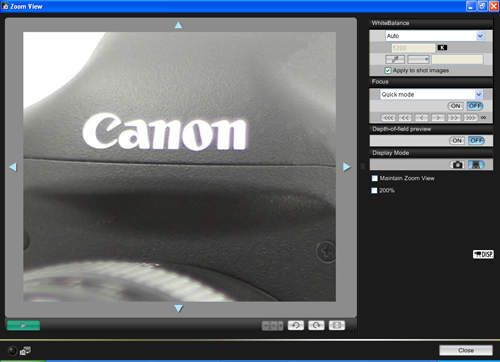
8. 按一下 [ ] (視窗下部中央) 顯示放大視窗。
] (視窗下部中央) 顯示放大視窗。步驟 8 中選擇的部分將以 100% (實際像素大小) 顯示。
要移動 [放大檢視 (Zoom View)] 視窗中的顯示位置,按一下 [ ]、[
]、[  ]、[
]、[  ] 或 [
] 或 [ ]。
]。
]、[ ]、[ ] 或 [ ]。按兩下 [放大檢視 (Zoom View)] 視窗中的影像返回至 [遙控即時顯示視窗(Remote Live View window)]。
9. 按一下 [對焦 (Focus)] 按鈕對焦影像。
[遙控即時顯示視窗 (Remote Live View window)] 會根據對焦位置的調整即時變更。
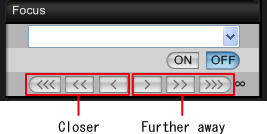
對焦調整量
-
 、
、 :調整量︰大
 -
 、
、 :調整量︰中
 -
 、
、 :調整量︰小
10. 對焦成功且拍攝已就緒時,按一下 [ ] 按鈕 (位於 [遙控即時顯示視窗 (Remote Live View window)] 的左下方)。
] 按鈕 (位於 [遙控即時顯示視窗 (Remote Live View window)] 的左下方)。
11. 按一下 ( ) 按鈕開始拍攝。
) 按鈕開始拍攝。在 [遙控即時顯示視窗 (Remote Live View window)] 的左下方將顯示 [ ] 圖示和記錄時間。
] 圖示和記錄時間。
再次按一下 [ ] 按鈕結束拍攝。
] 按鈕結束拍攝。NOTE
在遙控即時顯示拍攝中,如果操作相機拍攝短片時未按一下 [ ] 按鈕,拍攝可能無法進行。
] 按鈕,拍攝可能無法進行。在快速、即時和即時臉部偵測自動對焦模式下,影像按在相機上的對焦方式自動對焦。
要自動對焦,請遵照「遙控即時顯示拍攝 (手動對焦)」的步驟 1 至 8 操作,並設定各自的自動對焦模式。
使用快速模式對焦
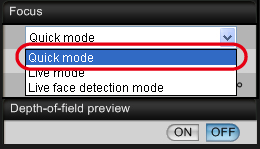
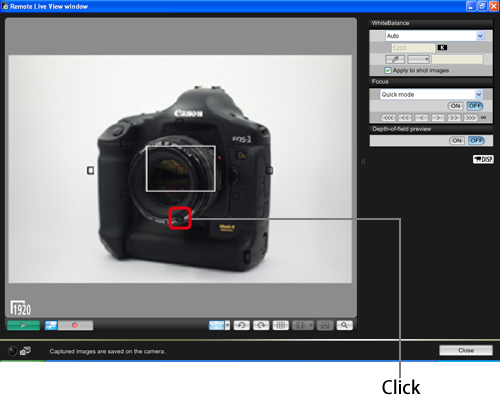
9. 從 [對焦 (Focus)] 清單方塊中選擇 [快速模式 (Quick mode)]。
出現自動對焦點。
10. 按一下您想要對焦位置的自動對焦點。
- 透過按 [
 ] (位於 [
 ] 中) 可以在自動對焦點自動選擇與自動對焦點手動選擇之間切換。
 - 自動選擇時,所有自動對焦點自動選擇。
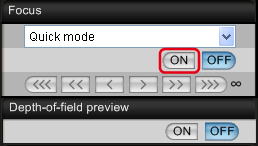
11. 按一下 [開 (ON)]。
- 執行自動對焦。
- 對焦成功時,相機發出聲響,影像將重新出現在「遙控即時顯示視窗 (Remote Live View window)」上,自動對焦點變紅。
- 要取消自動對焦操作,按一下 [關 (OFF)] 按鈕。
12. 當對焦成功,拍攝已就緒時,按一下 [ ] 按鈕 (位於 [遙控即時顯示視窗 (Remote Live View window)] 的左下方)。
] 按鈕 (位於 [遙控即時顯示視窗 (Remote Live View window)] 的左下方)。
13. 按一下 [ ] 按鈕開始拍攝。
] 按鈕開始拍攝。在 [遙控即時顯示視窗 (Remote Live View window)] 的左下方將顯示 [ ] 圖示和記錄時間。
] 圖示和記錄時間。
再次按一下 [ ] 按鈕結束拍攝。
] 按鈕結束拍攝。使用即時模式對焦
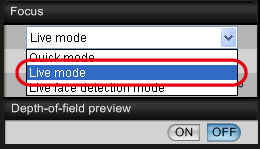
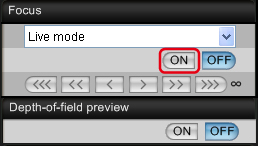
9. 從 [對焦 (Focus)] 清單方塊中選擇 [即時模式 (Live mode)]。
出現自動對焦點。
10. 將放大顯示框拖曳到您想要對焦的位置。
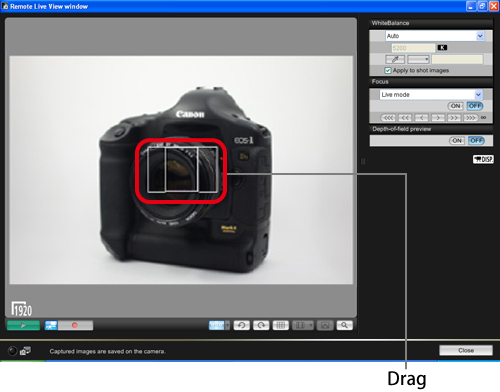
11. 按一下 [開 (ON)] 按鈕。
- 執行自動對焦。
- 對焦成功時,相機發出聲響,自動對焦點變綠。
- 如果對焦不成功,自動對焦點將變紅。
12. 對焦成功且拍攝已就緒時,按一下 [ ] 按鈕 (位於 [遙控即時顯示視窗 (Remote Live View window)] 的左下方)。
] 按鈕 (位於 [遙控即時顯示視窗 (Remote Live View window)] 的左下方)。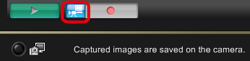
13. 按一下 ( ) 按鈕開始拍攝。
) 按鈕開始拍攝。在 [遙控即時顯示視窗 (Remote Live View window)] 的左下方將顯示 [ ] 圖示和記錄時間。
] 圖示和記錄時間。
再次按一下 [ ] 按鈕結束拍攝。
] 按鈕結束拍攝。使用即時臉部偵測模式對焦
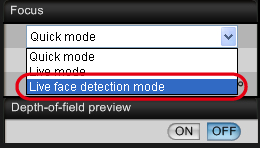
9. 從 [對焦 (Focus)] 清單方塊中選擇 [即時臉部偵測模式 (Live face detection mode)]。
- 偵測到臉部時會出現自動對焦點。
- 如果相機偵測到新的臉部,則當您將箭頭移至新臉部時會出現新的自動對焦點。按一下此位置,選擇自動對焦點。
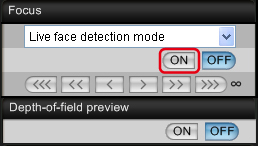
10. 按一下 [開 (ON)] 按鈕。
- 執行自動對焦。
- 對焦成功時,相機發出聲響,自動對焦點變綠。
- 如果對焦不成功,自動對焦點將變紅。
- 如果無法偵測到臉部,自動對焦點將固定於中央對焦。
11. 當對焦成功,拍攝已就緒時,按一下 [ ] 按鈕 (位於 [遙控即時顯示視窗 (Remote Live View window)] 的左下方)。
] 按鈕 (位於 [遙控即時顯示視窗 (Remote Live View window)] 的左下方)。
12. 按一下 [ ] 按鈕開始拍攝。
] 按鈕開始拍攝。在 [遙控即時顯示視窗 (Remote Live View window)] 的左下方將顯示 [ ] 圖示和記錄時間。
] 圖示和記錄時間。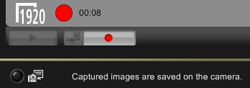
再次按一下 [ ] 按鈕結束拍攝。
] 按鈕結束拍攝。介紹遙控即時顯示拍攝的操作方法完畢。